Proper maintenance of garden tools is essential for effective gardening. If you've ever struggled with a loose wooden handle on your garden hoe, you're not alone. Many gardeners encounter this issue, and knowing how to fix a loose wooden handle on a garden hoe can enhance your gardening experience.
This problem often arises from wear over time or improper storage. Loose handles can hinder your control and make gardening a frustrating task. A secure handle ensures safety and efficiency when digging or weeding. Addressing this issue is straightforward but requires attention to detail.
In this guide, we will explore practical methods for tightening and securing the handle effectively. You’ll learn techniques that can restore your hoe to its optimal working condition. With a few tools and some effort, your hoe will feel stable and ready for all your gardening challenges once again. Understanding how to fix a loose wooden handle on a garden hoe not only improves your tool's function but also deepens your connection to your garden.
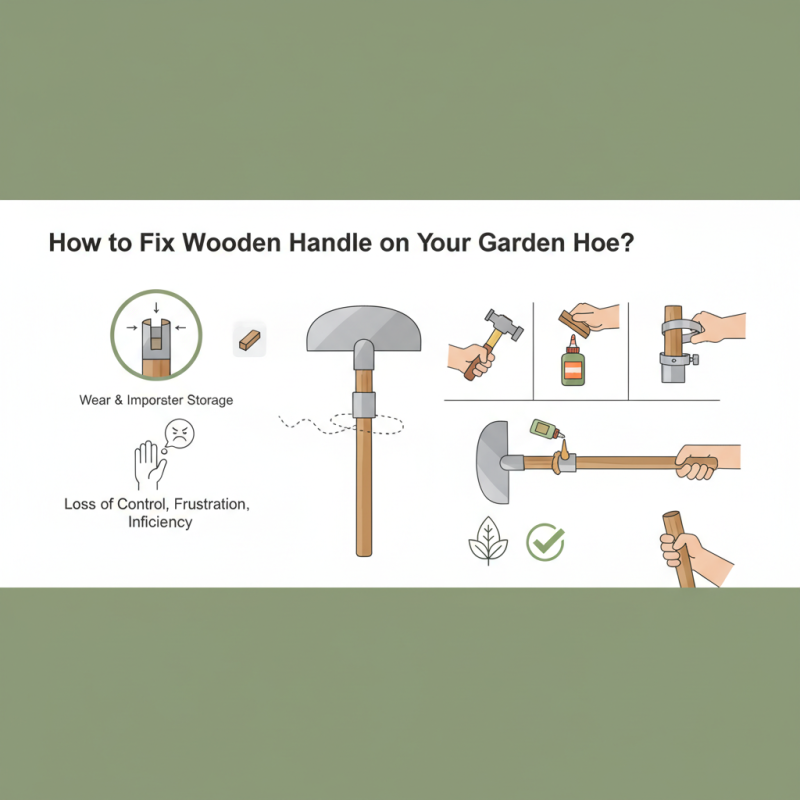
Assessing the looseness of your wooden hoe handle is crucial for effective gardening. Start by firmly holding the hoe and checking for movement. Wiggle it gently. If you feel any give, it’s time to address the issue. Pay attention to the handle joint, as this is often where the problem lies.
Tips: A loose handle can lead to accidents. So, don’t ignore it. Inspect your tools before each use. This small step can save you from injuries and enhance your gardening experience.
Look for gaps between the handle and the hoe head. These indicate that the handle is becoming detached. Listen for any creaking sounds when you apply force. This could signal that the wood is starting to split. It's important to take these signs seriously; they can lead to bigger problems later.
Tips: Keep your hoe in a dry place to prevent swelling. Moisture can worsen the looseness issue. Regular maintenance will extend the lifespan of your tools and ensure you can work effectively. Remember, addressing problems early is key to a successful gardening season.
Loose wooden handles on garden tools can lead to frustration during gardening tasks. Several common causes contribute to this issue. Wood can expand or contract due to temperature and humidity changes. This natural shift can cause the handle to loosen over time. Additionally, wear and tear from regular use can weaken the connection between the handle and the tool. Even minor accidents can create gaps in that bond, contributing to looseness.
Improper storage is another factor. Leaving tools outside exposed to the elements can lead to deterioration. Moisture can seep into the wood, making it swell and then shrink as it dries. When this cycle repeats, the handle's fit can become less secure. It's essential to recognize these causes to address them effectively. Regularly inspecting garden tools can help identify potential issues before they worsen. Maintaining your tools not only prolongs their lifespan but also improves your gardening experience.
Garden hoe handles can become loose over time. This is common, especially with frequent use. A loose handle can affect your gardening efficiency. Fortunately, tightening it is a straightforward task.
Start by inspecting the handle. Look for any visible gaps between the handle and the hoe head. If the fit is loose, remove the handle. Applying wood glue to the tenon can improve the fit. Use clamps to hold it in place for the recommended drying time. Ensure you apply even pressure. Excess glue can create a mess; wipe away any extra.
After the glue has dried, check the tightness again. If still loose, consider adding wooden wedges. Insert the wedges snugly into the sides of the handle. This should provide additional stability. Remember, not every fix will be perfect on the first try. You may need to adjust your technique. A well-maintained hoe will last longer and make your gardening experience more enjoyable.
When dealing with a loose wooden handle on your garden hoe, having the right tools is essential. Start by gathering wood glue. It works effectively for small repairs and is easy to use. A rubber mallet can also help in securing the handle back into place without causing damage. Additionally, sandpaper will be useful for smoothing surfaces and ensuring a snug fit.
Next, a towel or cloth is helpful for cleaning excess glue. It's important to apply the glue evenly and remove any overflow for a neat finish. A clamp can secure the parts together while the glue dries. Take your time with each step. Rushing can lead to mistakes, which is often frustrating.
Lastly, a chisel might be necessary if the hole in the hoe has become too large. Carefully chiseling it to a smaller size can provide a tighter fit for the handle. This step demands attention. Improper chiseling can ruin the hoe. Remember, every repair is a learning experience. Make notes on what goes well and what needs adjustment for future repairs.
When it comes to maintaining gardening tools, ensuring a firm handle is crucial. A loose handle can hinder your efficiency and increase the risk of injury. According to a report by the National Gardening Association, nearly 50% of gardening accidents occur due to faulty tools. A loose handle can lead to slips, making it essential to address this issue proactively.
To prevent handle looseness, proper storage and care are key. When not in use, tools should be stored in a dry area to prevent moisture damage. Research shows that dry wooden handles are less likely to swell or crack, which can cause loosening. Additionally, regular inspections are vital. Checking handles for signs of wear or damage allows for timely repairs, potentially extending the tool's lifespan.
Using oil treatments is another effective preventive measure. A light application of linseed oil can help maintain the wood's integrity, making it more resistant to environmental changes. It's important to remember that even the best maintenance won't guarantee perfection. Over time, wear and tear are inevitable. Embracing this reality can lead both to better care practices and to improved tool longevity.
: Hold the hoe firmly and wiggle it gently. If you feel movement, it's likely loose.
Look for gaps between the handle and the hoe head. Listen for creaking sounds during use.
Wood expands and contracts with temperature and humidity changes, leading to looseness.
Moisture can cause the wood to swell and shrink, worsening the looseness over time.
Inspect the handle for gaps. If loose, remove it and apply wood glue to the tenon.
Use clamps to hold the handle in place evenly while the glue dries; wipe away excess glue.
Consider adding wooden wedges into the sides of the handle for extra stability.
Inspect your tools before each use to avoid accidents and enhance your gardening experience.
Yes, neglecting a loose handle can lead to accidents and affect gardening efficiency.
Not every fix will be perfect the first time. You may need to adjust your technique.
If you find yourself wondering how to fix a loose wooden handle on a garden hoe, this article provides a comprehensive guide to tackle the issue effectively. Start by assessing the looseness of your hoe handle to identify the problem. Common causes include wear and tear from frequent use, changes in temperature and humidity, or improper storage. The article then outlines a step-by-step process for tightening the handle, ensuring it is secure for your gardening tasks.
Additionally, it suggests essential tools and materials you may need for the repair, such as wood glue or screws, depending on the extent of the looseness. To prevent future issues with handle looseness, the article recommends taking preventive measures, including proper maintenance and storage techniques. By following these guidelines, you can ensure a sturdy and reliable garden hoe for all your gardening activities.

Moxie Garden