A garden dibber is an invaluable tool for planting seeds precisely. As gardening expert Jane Greenfield once said, "A dibber allows gardeners to create the perfect hole for seeds, ensuring optimal growth." Understanding how to use a garden dibber for seeds can transform your planting experience.
Using a dibber might seem straightforward, yet many overlook its nuances. The depth and spacing of each hole matter greatly. It's crucial to ensure that the holes match the seed type. For example, larger seeds require deeper holes. Careful planning at this stage ensures better sprouting.
While many gardeners swear by using dibbers, some may find it challenging initially. It takes practice to gauge the right pressure and angle. This learning curve can feel frustrating but is part of the gardening journey. However, with time, mastering how to use a garden dibber for seeds will become second nature.
A garden dibber, or seed dibber, is a simple yet effective tool. It helps plant seeds efficiently and accurately. Typically made of wood or metal, a dibber features a pointed tip. This design allows it to penetrate the soil easily. Gardeners use it to create holes for seeds, ensuring they are spaced correctly.
Using a dibber can enhance your planting technique. Insert the tool into the ground to the desired depth. For small seeds, shallow holes are ideal. For larger seeds, push deeper. This method promotes better seed-to-soil contact. However, if the soil is too dry or compacted, it might be challenging to use. Always check the soil condition before you start.
Sometimes, gardeners overlook the dibber's importance. They often dig holes with their hands. This can lead to inconsistencies in planting depth. Consider the advantages of using a dibber. Accurate planting aids seed germination, leading to healthier plants. Experiment with your technique. You'll discover what works best for you over time.
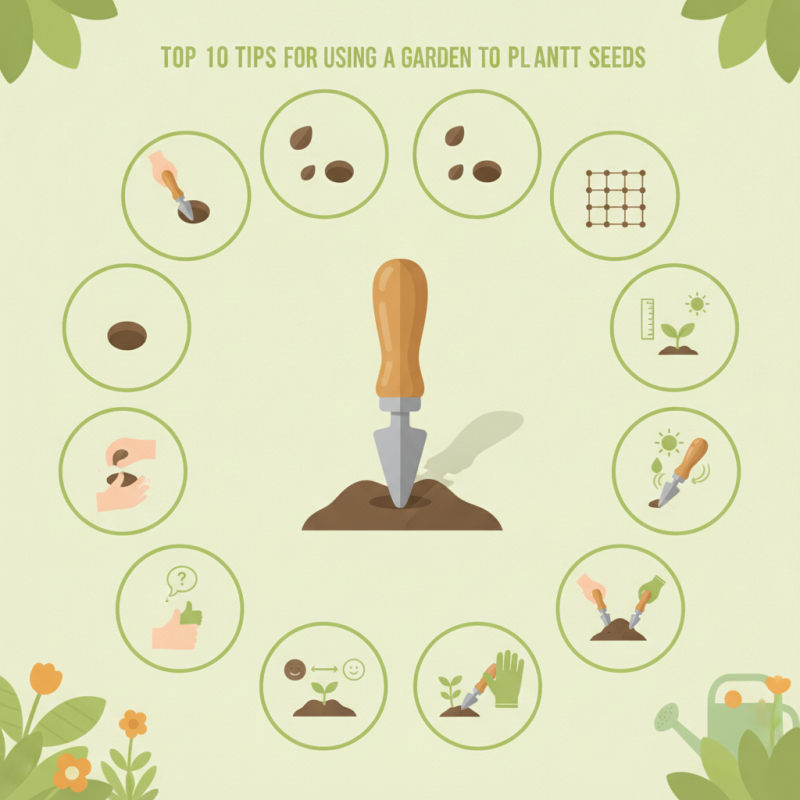
| Tip Number | Tip | Description |
|---|---|---|
| 1 | Choose the Right Dibber | Select a dibber that suits the type of seeds you want to plant and the size of your hands. |
| 2 | Prepare the Soil | Ensure the soil is well-tilled and free from debris for easier planting. |
| 3 | Mark Planting Rows | Use a string line or other method to keep your rows straight. |
| 4 | Moisten the Soil | Lightly water the area before using the dibber to make it easier to create holes. |
| 5 | Use the Right Depth | Ensure the holes you create are at the recommended depth for your seeds. |
| 6 | Space Your Seeds Properly | Follow the spacing guidelines on seed packets to avoid overcrowding. |
| 7 | Plant at the Right Time | Check for optimal planting times based on your climate and the seed type. |
| 8 | Gently Cover the Seeds | After planting, cover seeds lightly with soil and tamp down to ensure good soil contact. |
| 9 | Label Your Rows | Use markers to remember what seeds you've planted where. |
| 10 | Water Evenly | After planting, water gently to avoid displacing the seeds. |
: A garden dibber is a tool for planting seeds effectively. It has a pointed tip for easy soil penetration.
Using a dibber helps create consistent holes for seeds. This promotes better seed germination and healthier plants.
Insert the dibber into the soil to the desired depth. Adjust the depth based on the size of the seeds.
Wooden dibbers are popular for their durability. Plastic dibbers are lightweight and easier to clean for beginners.
A standard dibber should be 1-2 inches deep. Some vegetables may need deeper planting for optimal growth.
Using hands can lead to inconsistent planting depth. A dibber ensures better spacing and seed-to-soil contact.
A comfortable handle can prevent strain and discomfort. Many gardeners experience hand fatigue during extended use.
Experiment with different shapes and sizes. What feels good to you may not suit everyone else’s needs.
It can be difficult to use a dibber. Always check soil conditions before starting your planting session.
A garden dibber is an essential tool for planting seeds, providing precision and ease in creating holes for seed placement. Understanding the garden dibber’s definition and uses is crucial for maximizing its effectiveness. When selecting the right dibber, consider factors such as size and material that match your planting needs. Preparing your garden bed is the next step, ensuring a suitable environment for your seeds to thrive.
To master how to use a garden dibber for seeds, follow a step-by-step guide that outlines the correct technique for inserting the dibber into the soil and spacing your seeds accurately. Additionally, maintaining your garden dibber is key for longevity and optimal performance; regular cleaning and proper storage can extend its life, allowing you to enjoy its benefits season after season. By following these tips, you can improve your seed planting experience significantly.