Why is My Pruning Shear Not Cutting 5 Quick Fixes?

Time:2026-04-08 Author:Ethan
0%

When faced with the frustrating question, "Why is my pruning shear not cutting?" it's essential to understand the tools we rely on. According to gardening expert Thomas Green, “A dull shear can ruin your gardening experience.” If your shears are struggling, it’s likely due to a few common issues.

Over time, pruning shears can become dull, misaligned, or even rusty. Regular maintenance is often neglected, leading to ineffective tools. A dull blade requires more effort, resulting in jagged cuts and potential damage to your plants. Keep an eye on how your shears perform; signs of wear should not be ignored.

If you find yourself asking, "Why is my pruning shear not cutting?" it may be time to reevaluate your maintenance routine. Inspecting the tension, sharpening the blades, and clean lubrication can prevent future headaches. Remember, even small adjustments can lead to significant improvements. A pruned plant is a healthy plant, so don’t let a simple problem hinder your gardening efforts.

Why is My Pruning Shear Not Cutting 5 Quick Fixes?

Common Reasons for Poor Cutting Performance in Pruning Shears

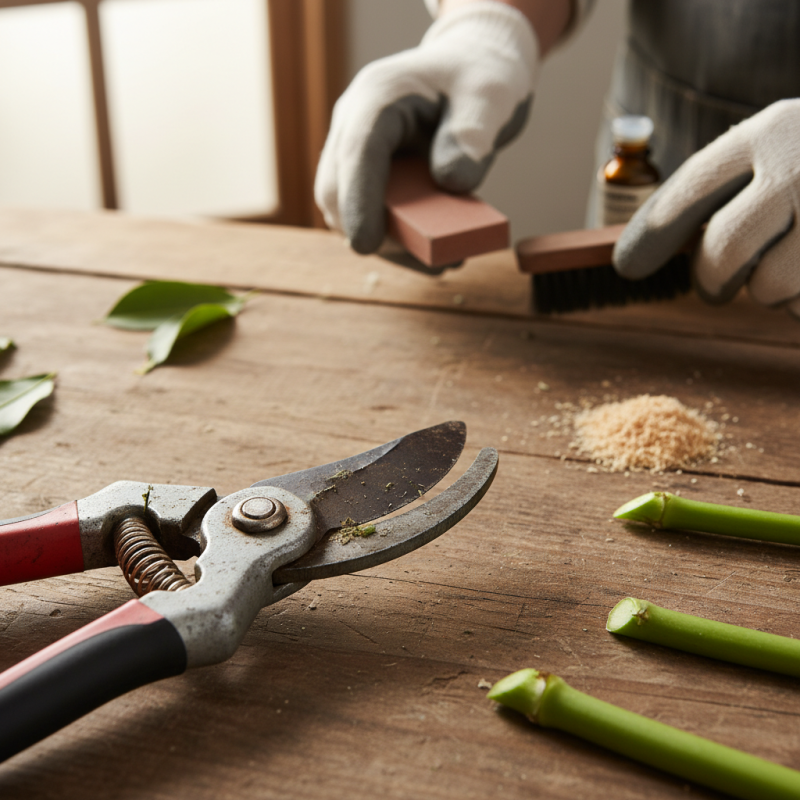
Pruning shears are essential tools for garden maintenance. If they fail to cut effectively, it can lead to frustration and wasted effort. One common reason for poor performance is dull blades. According to industry reports, nearly 30% of users neglect regular sharpening. Dull blades can rip and tear plants rather than make clean cuts. This can harm the plant's health.

Another issue may be dirty blades as debris can accumulate. This dirt can interfere with precise cutting. Studies indicate that over 20% of gardeners fail to clean their tools after use. Cleaning pruning shears not only improves performance but also prolongs their lifespan. Additionally, misaligned blades can be a problem. If the blades do not contact properly, cutting becomes difficult. Regular inspection and adjustment are essential for optimal alignment.

Lastly, improper technique can hinder cutting efficiency. Many users apply excessive force, which can lead to fatigue and poor results. Experts advise focusing on correct hand positioning and grip. This can help enhance cutting ability. Everyone can improve their technique with practice, ensuring better performance of their pruning shears.

Common Reasons for Poor Cutting Performance in Pruning Shears

Inspecting the Blades: Checking for Damage and Dullness

Inspecting the blades of your pruning shear is crucial. Start by visually examining them. Look for any noticeable damage, such as chips or nicks. These imperfections can prevent blades from closing seamlessly. A closer inspection may reveal signs of rust or corrosion. These issues not only affect performance but also lead to further degradation over time.

Next, check for dullness. A sharp blade makes clean cuts, while a dull one tears at the plant. If the blades don't slice through stems easily, it's likely time for sharpening. You might try cutting through a small branch. If it crushes rather than cuts cleanly, a deeper examination is warranted. Be mindful of the angle and consistency of the edges. A quick touch-up with a sharpening stone might solve the problem, but over time, even the best tools can wear out.

Regular maintenance can reduce issues. However, many users neglect this aspect. It’s important to form the habit of inspecting blades after each use. Take note of how the shears perform over time. This reflection may guide better handling and care practices. Remember, a well-maintained tool is safer and more efficient, promoting healthier plants and a smoother gardening experience.

Cleaning and Lubricating Your Pruning Shears for Optimal Performance

Cleaning and lubricating your pruning shears is essential for maintaining optimal performance. Over time, sap, dirt, and dust accumulate on the blades, causing them to lose their sharpness. Start by wiping the blades with a cloth dampened in soapy water. This simple act removes most grime. Pay close attention to the pivot area; it often traps debris. A soft brush can help dislodge stubborn particles.

After cleaning, lubrication is crucial. Use a lightweight oil to prevent rust and keep the blades moving smoothly. Apply a few drops on both sides of the blades and around the pivot. Open and close the shears several times to distribute the oil evenly. This process ensures your shears cut through branches like butter. Regular maintenance extends the life of your tools and improves your cutting experience.

Neglecting these steps can lead to frustration during gardening tasks. Blades can become dull, making cleaning and lubricating even more difficult. If your shears don’t cut well, re-evaluate your maintenance routine. Sometimes, it’s just the little things that make all the difference. Ensure you commit to regular care, and your shears will reward you with effective performance.

Adjusting the Tension: Finding the Right Balance for Smooth Cuts

When using pruning shears, one common issue is improper tension. This can lead to a frustrating cutting experience. Finding the right balance is crucial for smooth cuts and improved efficiency. If the tension is too loose, the blades may fail to meet properly, leaving you with jagged edges. Conversely, excessive tension can make the shears difficult to operate.

To adjust the tension, locate the pivot point on your shears. There is typically a screw or bolt there. Use a screwdriver to tighten or loosen it. Adjust little by little. After each adjustment, perform a few cutting motions. This helps you gauge if the tension feels adequate. Trust your instincts—if it feels off, keep adjusting.

Regular maintenance can be overlooked. Ensure your blades are clean and free from sap or debris. A dirty blade can hinder performance, regardless of tension settings. Check if lubricating the pivot point aids in movement as well. Remember, well-maintained tools lead to better gardening outcomes. Embrace the process; it's about improvement.

Why is My Pruning Shear Not Cutting 5 Quick Fixes? - Adjusting the Tension: Finding the Right Balance for Smooth Cuts

Fix Description Tools Needed Frequency
Check Blade Sharpness Ensure that the blades are sharp to make clean cuts. Sharpening tool or stone Seasonally
Adjust Tension Loosen or tighten the bolt to find the balance that allows smoother cutting. Wrench Before first use and after heavy use
Clean the Blades Remove sap and debris that can inhibit cutting. Cleaning solution and cloth After each use
Lubricate Moving Parts Apply lubricant to the pivot points to reduce friction. Lubricant spray Monthly
Inspect for Damage Check for any bends or cracks that may affect performance. Visual inspection Before use

When to Replace Your Pruning Shears: Signs of Irreparable Damage

When it comes to pruning shears, knowing when to replace them is essential. Look for signs of irreparable damage. If your shears have deep rust or corrosion, it's time to let them go. Rust can weaken the metal and compromise performance. Dull blades are another indicator. If sharpening doesn’t help, replacement might be your best option.

Consider the handles too. Cracked or broken handles make tools unsafe. If your shears are not comfortable to use anymore, they likely need replacing. A good grip is crucial for precision.

Tips for maintaining shears: Clean blades after each use. Remove sap and dirt to prolong their life. Sharpen blades regularly. Use a sharpening stone or file for accuracy. Lastly, store them properly to avoid damage. A simple cloth cover can protect them from dust and moisture. Regular care can delay the need for replacements, but keep an eye on those warning signs.

FAQS

: What causes poor cutting performance in pruning shears?

: Common causes include dull blades, dirty blades, misalignment, and improper technique.

How often should I sharpen my pruning shears?

Regular sharpening is crucial. Many users forget this, leading to performance issues.

What happens if the blades are dull?

Dull blades can rip and tear plants, harming their health.

How can dirt affect my pruning shears?

Dirty blades can impede precise cutting. Cleaning after use is essential for good performance.

What should I look for when inspecting my blades?

Check for chips, nicks, rust, and dullness. These can affect performance.

How can I tell if my blades need sharpening?

Try cutting through a small branch. If it crushes, sharpening is needed.

What is the impact of misaligned blades?

Misalignment can make cutting difficult. Regular inspection and adjustment are important.

How can technique improve cutting efficiency?

Correct hand positioning and grip can enhance cutting ability with practice.

Why is regular maintenance important for pruning shears?

Regular maintenance prevents issues. Many users neglect this, leading to performance decline.

What should I reflect on after using my shears?

Consider how they performed over time to guide better handling and care practices.

Conclusion

If you're wondering "Why is my pruning shear not cutting?", several common issues could be at play. First, it's essential to inspect the blades for any signs of damage or dullness, as these factors can significantly hinder cutting performance. Regular cleaning and lubrication of the shears are vital to ensure that they operate smoothly and efficiently.

Additionally, adjusting the tension of the shear is crucial for achieving the right balance, which contributes to effortless cutting. If you notice any irreparable damage despite maintenance, it may be time to consider replacing your pruning shears. By addressing these common concerns, you can improve your shears’ performance and ensure a more effective pruning experience.

Ethan

Ethan

Ethan is a seasoned marketing professional with a deep expertise in our company's innovative product line. With a passion for sharing knowledge and insights, he takes the lead in regularly updating our corporate blog, where he explores industry trends, product features, and effective marketing......